| Outside the Dark Side |
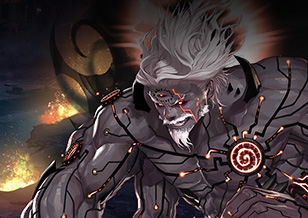
Michael of the Holy Eye |
- Generates a shield around itself. You must destroy this shield to attack Michael.
- Delivers a series of powerful combo attacks, each combo consisting of two punches and an uppercut.
- If Michael receives great damage, he summons an Angel of Justice that attacks you and restores his HP when it successfully hits.
- Depending on the difficulty level, Michael uses the skill that summons a holy cross and a hammer to attack.
|
| Chaos Seal Stone |
- This is a new Named monster.
- It explodes if you get near it.
- Periodically summons an orb that follows a target and explodes after casting delay.
- A bigger orb is added, depending on the difficulty level.
- Periodically summons a pillar that continuously follows a target after casting delay.
- If its HP drops to a certain amount, it makes itself become invulnerable to attacks and summons monsters after casting delay.
- If you defeat all the summoned monsters, Chaos Seal Stone becomes vulnerable to attacks again.
|
| Defected Priest |
- This is a new Named monster.
- Defected Priest has a strong body that never fails him.
- He shoots stones from the ground in front of him, and performs Slashes of Blood.
- He charges at characters and sends them flying.
- If Defected Priest receives great damage, he enters Berserker mode and improves his physical capabilities, e.g., speeds, Atk., and Def.
- Depending on the difficulty level, he also uses additional skills, charging at characters and throwing them backward, or sending forth a shock wave across a broad area.
|
| Corrupt Priest |
- This is a new Named monster.
- Swings a scythe, delivering combo/multi-hit attacks.
- If Corrupt Priest receives great damage, he teleports forward and inflicts great damage on characters in his path.
- Depending on the difficulty level, Corrupt Priest also uses additional skills to pull or Immobilize characters.
|
(Boss)
Awakened Michael of the Holy Eye |
- Michael, having been blessed by an archangel, is stronger and capable of using the power of the Holy Eye.
- If you face Michael during the Holy Eye skill, your HP rate is swapped with Michael's.
|
| Dark Side |
Chaos Seal Stone |
- It's the same Chaos Seal Stone that appears Outside the Dark Side.
|
| Despairing Tiamat |
- Swings her spear and causes Bleeding as a Basic attack.
- Quickly advances, swinging her spear and causing Bleeding, as a Basic attack.
- Periodically swings her spear and summons a black hole that pulls characters.
- Periodically summons a cape that grabs and restrains characters.
- Periodically summons a massive cape after a delay.
- This cape cocoons its target. You can release yourself from the cocoon by pressing certain buttons.
- Depending on the difficulty level, Tiamat recovers a certain amount of HP while you are cocooned.
- If her HP drops to a certain amount, she summons grim reapers and hides for a while.
- The number of summoned grim reapers varies, depending on the difficulty level.
|
| Destructive Berias |
- Swings a zanbato, attacking from close range.
- Jumps and strikes the ground, causing severe Knockback and Stun, as a Basic attack.
- Periodically detonates the ground underneath you after casting delay.
- Periodically summons multi-hitting twisters that pull characters after casting delay.
- The number of summoned twisters varies, depending on the difficulty level.
- When Brias's HP drops to a certain amount, he casts a twister on himself, pulling enemies and allies alike.
- This twister's pulling strength and damage is affected by the difficulty level.
- Periodically summons Ghosts of Destruction from map objects.
- The Ghosts of Destruction are absorbed by Berias when they are near them, providing a powerful defense buff.
- This defense buff stacks up to 3 times and lasts for a set amount of time.
- The number of summoned Ghosts of Destruction varies, depending on the difficulty level.
|
| Horrendous Astaros |
- Combines 2 lateral slashes, one uppercut, and one downward strike as a Basic attack.
- Dashes in a straight line as a Basic attack.
- When you become more than a certain distance away from him, he marks you after casting delay.
- He then teleports behind you and deliver his Basic Combo attacks.
- When his HP drops to a certain amount, he generates a shield around himself and causes casting delay before summoning Fears of Death.
- Fears of Death explode themselves and casts Slow that gradually Immobilize you.
- Fears of Death can be attacked and eliminated.
- The number of summoned Fears of Death is affected by the difficulty level.
|
(Boss)
Ozma of Chaos |
- Shoots 3 slowly advancing orbs as a Basic attack.
- Summons dark energy from the ground 3 times as a Basic attack.
- Summons pillars of darkness from where characters are standing as a Basic attack.
- Periodically summons Imposter monsters in the map.
- Periodically shoots laser beams forward and summons several dark spikes in random locations.
- Periodically summons a black hole that pulls characters after casting delay.
- Depending on the difficulty level, this black hole pulls with more force and causes damage and Confusion.
- When Ozma's HP drops to a certain amount, the Chaos Eye appears above his head.
- While the Chaos Eye is opened, Ozma summons a pentacle on your spot when you attack him.
- If you stay inside the pentacle for a certain amount of time, you will turn into a monster.
- You can cancel the monster form by pressing certain buttons.
- The Chaos Eye's blinking frequency is affected by the difficulty level, and it opens itself wide if it receives great damage.
|
Lotus's Stronghold
|
Corrupt Centaur Captain |
- The Centaur's soldiers generate a shield around him, blocking a certain amount of damage.
- Pulls surrounding enemies and delivers a forward slash.
- Summons clones that charge at enemies in front.
- Leap over to an enemy, attacks it, and then sends forth a shock wave for additional damage.
|
| Amphora |
- Scatters several seeds that grow into Dendroids.
- Shoots up its roots in a straight line.
- Shoots thorns forward multiple times.
- If its HP drops to a certain amount, it eats the torch in its hand and burns the grass that the Dendroids have generated.
|
| Head Librarian Isadora |
- Performs Shadow attacks that move forward and return.
- Periodically teleports away when attacked, leaving a decoy on her spot. These decoys add a buff to her if she eats them.
- Causes a Fire explosion from the ground. The pentacle follows its target for this skill's duration.
- Generates Shadow pillars that push surrounding enemies.
- Summons a Shadow orb in the sky that grows bigger with time. This orb, once it reaches its maximum size, crashes onto the ground and causes a great explosion.
|
| High Priest Alsor |
- Spits poison forward. This poison inflicts continuous damage on those who are standing on it and Slows them down.
- Shoots several spears imbued with the power of his goddess.
- Lets out a battle cry, inflicting multi-hit damage on surrounding enemies.
- Drops a Holy Grail. If you eat the Holy Grail, Alsor will become frantic. Lure him and destroy the barrier around the Goddess's Halidom, and then you can destroy the Halidom.
- If you destroy the Goddess's Halidom, Alsor's Def. decreases and he temporarily becomes incapacitated.
|
(Boss)
Gangling Lotus |
- Generates several plumes of water while on the ground.
- Roars, inflicting multi-hit damage on enemies in front.
- Shoots up tentacles from the ground. These tentacles remain for a while, inflicting damage on surrounding enemies.
- Stretches his tentacles, grabs characters in front, and slams them onto the ground.
- If his HP drops to a certain amount, he goes underwater and launches AoE attacks. At higher difficulty levels, he also uses Mind Control.
- While he's underwater, his attacks confine their targets.
- Thrusts his tentacles into the ground and shoots them back up from underneath characters. He additionally attacks as many times as the remaining tentacles in the map.
- Lotus's tentacles strike surrounding enemies downward.
|
| Castle of Bakal |
Itrenok, the Green Dragon |
- Generates a scaly barrier to protect himself.
- He is invulnerable to attacks while protected by this barrier.
- This barrier is destroyed if it receives a certain amount of damage.
- The maximum number of times that he generates this barrier is affected by the difficulty level.
- Dashes forward, clawing at enemies multiple times.
- Thrashes his tail at surrounding enemies, and then roars.
- The delay between the tail attack and the roaring and the number of hits by the roaring vary, depending the difficulty level.
- Jumps high and forcefully strikes the ground with his tail.
- The jump height, attack delay, and shock wave range and effect vary, depending on the difficulty level.
- Enters Berserker mode after his scaly barrier is destroyed for the last time.
|
| Neiser, the Black Dragon |
- Shoots Daggers of Destruction forward.
- The number of daggers shot varies, depending on the difficulty level.
- When his HP drops to a certain amount, he uses the Fear of Darkness pattern.
- Depending on the difficulty level, he summons 1 - 3 Lesser/Common Spirits that have flames of darkness.
- Common Spirits are summoned with the flames, and leave the flames on the ground when eliminated.
- Common Spirits restore the Black Dragon's HP by up to a certain amount after casting delay.
- Until the flames reach the Black Dragon, he repeatedly teleports and throws Daggers of Destruction.
- Uses Touch of Darkness to attack nearby enemies.
- When Touch of Darkness hits an enemy, the Black Dragon moves backward, throwing Daggers of Destruction.
- Randomly summons ghost pillars within a certain range.
- These pillars inflict multi-hit damage until they disappear.
- The number of summoned ghost pillars varies, depending on the difficulty level.
- Together with his clones, the Black Dragon shoots forward flames of darkness.
- These flames inflict damage on the targets that they hit and remain on the ground for a while.
- The flames cause Bleeding while on the ground.
|
| Numak, the Gold Dragon |
- If his HP drops to a certain amount, he summons 1 - 3 spiritual residue, depending on the difficulty level.
- Summons a barrier from underneath you to attack you.
- This barrier rises from the ground, attacking you. Its number of hits is affected by the difficulty level.
- Shoots forward a wave of barriers.
- The number of barriers shot varies, depending on the difficulty level.
- Summons and shoots barriers that explode on contact.
- The number of summoned barriers varies, depending on the difficulty level.
- Randomly summons barriers in the map that explode after a while.
- These barriers explode after a while if not destroyed.
- The number of summoned barriers varies, depending on the difficulty level.
- If his HP drops to a certain amount, he responds to incoming damage by creating a chance of summoning a barrier wall.
- This barrier wall can't be penetrated by characters unless destroyed.
|
| Ash Core, the Flame Dragon |
- Uses a fiery aura that increases his Def.
- It's first generated when his HP drops to a certain amount, and then regenerated when you are hit by his fiery breath.
Shoots forward a fiery slash wave.
- The wave size and attack range vary, depending on the difficulty level.
- Shoots a fiery slash wave from a distance behind you.
- The wave size and attack range vary, depending on the difficulty level.
- Hits a target, pulls it, and then strikes it downward in a combo attack.
- Breathes a big plume of fire at enemies in front.
- The fire's attack range and Atk. vary, depending on the difficulty level.
- If his HP drops to a certain amount, he enters Berserker mode.
|
(Boss)
Bakal, the King of Dragons |
- Forcefully claws at nearby enemies.
- Randomly drops rocks after the attack.
- Spits a fireball at enemies that are a certain distance away.
- This fireball's attack range varies, depending on the difficulty level.
- If you are behind Bakal, he uses Shout, inflicting damage and pulling you to the front of his.
- Flies into the air and roars, detonating the ground.
- The number of explosions and their attack range vary, depending on the difficulty level.
- Flies sideways, dropping fiery meteors onto the ground.
- The number of dropped meteors and their attack range vary, depending on the difficulty level.
- Shoots a big fireball, concentrates his fiery energy, and breathes fire again.
- The breath attack's range varies, depending on the difficulty level.
- While preparing the breath attack, he shoots a number of fireballs, depending on the difficulty level.
- These fireballs create a chance of Burning their targets.
- When Bakal breathes, the tiles around him are set on fire.
|
| Reshpon, Village of Pain |
Covetous Dumpherion |
- Swings his arms as his Basic attack.
- Periodically casts Blind and Confusion after casting delay.
- If you move a certain distance away from him, he shoots multi-hitting dark orbs.
- If you move a certain distance away from him, he displays a warning mark, and then charges at you.
- If his HP drops to a certain amount, he sticks to your character and drains its HP.
- The HP draining count and amount vary, depending on the difficulty level.
|
| Duke of Imprisonment Agonis |
- Swings his arms as his Basic attack.
- Periodically creates tiles around him and Immobilizes enemies that step onto the tiles after casting delay.
- Periodically creates tiles outside his vicinity and Immobilizes enemies that step onto the tiles after casting delay.
- If you move a certain distance away, he summons a dimensional slash that pulls you.
- Responds to incoming damage by creating a chance of evading attacks and causing a dark explosion that Poisons its targets.
- If his HP drops to a certain amount, he teleports to a random area and creates an area that damages and Immobilizes enemies.
- The number of times he creates this area varies, depending on the difficulty level.
- If his HP drops to a certain amount, he creates a powerful black hole on a random spot.
- This black hole pulls characters and inflicts a certain amount of damage on contact.
- This black hole's size and strength vary, depending on the difficulty level.
|
| Scarver |
- Swings its sword, knocking down characters, as its Basic attack.
- If you have your back on Scar, it creates a chance of charging at you.
- Periodically summons Scavengers.
- If its HP drops to a certain amount, it devours nearby Scavengers and recovers HP.
- If its HP drops to a certain amount, it knocks down your character and bites it, recovering HP.
- The HP draining count and amount vary, depending on the difficulty level.
- If its HP drops to a certain amount, it jumps and slams onto you.
- The number of these attacks vary, depending on the difficulty level.
|
| The Mad Piper |
- Swings his pipe as his Basic attack.
- If you move a certain distance away from him, he shoots purple poisonous butterflies in a straight line.
- If you are within a certain range from him, he shields himself with purple poisonous butterflies, pushing you away.
- Periodically summons Biting Rats and Giant Rats.
- If his HP drops to a certain amount, he summons swarms of rats as tall as towers.
- The number of times he summons rat swarms varies, depending on the difficulty level.
- If his HP drops to a certain amount, he summons waves of rats.
- The number of times he summons rat swarms varies, depending on the difficulty level.
|
(Boss)
Delezie, Plagued Apostle |
- He swings, chops, and stabs as Basic attacks.
- Periodically summons thorns in a straight line in front of him.
- If you move a certain distance away from him, he dashes forward, spinning like a drill.
- If you move a certain distance away from him, he turns into a twister, moving in your direction.
- Periodically summons a plague-carrying wind in a certain direction.
- If his HP drops to a certain amount, he moves to a random location, and then releases plague gas.
- The number of times he summons the plague gas varies, depending on the difficulty level.
- If his HP drops to a certain amount, he burrows and summons plague twisters.
- The number of summoned twisters varies, depending on the difficulty level.
- If his HP drops to a certain amount, he summons Fragments of Delezie.
- These fragments are absorbed into Delezie on contact, restoring his HP.
- The number of summoned fragments varies, depending on the difficulty level.
|
| Misc |
Ephelius |
- A Boss monster of Fire, Ephelius, will be added.
- If you approach Ephelius, it causes a shock wave and moves away.
- It concentrates its energy of fire on its right or left hand, depending on your location, and strikes downward.
- Randomly summons a meteor that causes a shock wave and continuous damage.
- Repeatedly shoots lava upward from where you are.
- If Ephelius receives great damage, it concentrates its energy of fire and shoots a fire cannon that instantly causes a great explosion in front of it.
|
 Edge
Click the "View Site Information" icon on the left side of the address bar,
Edge
Click the "View Site Information" icon on the left side of the address bar, Firefox
Select "Allow" in the notification window that appears
Firefox
Select "Allow" in the notification window that appears Other browsers
Allow blocked notifications in your browser’s settings.
Other browsers
Allow blocked notifications in your browser’s settings.


.jpg)
.jpg)
.jpg)
.jpg)
.jpg)
.jpg)
.jpg)
.jpg)
.jpg)

.jpg)
.jpg)
.jpg)
.jpg)
.jpg)

.jpg)


.jpg)

.jpg)


.jpg)


.jpg)