Combat System Improvements

The Neutralize system will be improved.
- Changed to allow you to decrease more Neutralize Gauge in proportion to your character's damage.
The Ignite system will be added.
- Your Neutralize Gauge Decrease Rate will increase based on the amount of your Ignite Gauge in real-time.
- The Ignite system increases over time from your first hit on a monster.
- When you're hit by a monster, your Ignite Gauge will decrease and stop, and will resume after a while.
- All Ignite Gauge specs will be applied per individual.
The Counter system will be improved.
- Monsters will now only enter Counter mode at certain moments during their attack pattern.
- Monsters will display improved damage effects during Counter mode.
All monsters between Levels 1 and 140 will have their HP reduced by 20%.
Status Notation Improvements and New Abnormal Statuses Added
Buff Icon Display Improvements

Buff and debuff icons will now be displayed on separate lines.
- Buff Icons: Aligned on the bottom line
ㄴ Changed some character skill buffs that used to display a common icon to display the icon for that skill.
- Debuff Icons: Aligned on the top line
ㄴ Debuff icons will only display Abnormal statuses and will have a border added.

The Party Status window will now display buff and debuff icons separately.
- All debuff icons will now be displayed last.
Invincibility Visibility Improvement

An effect will now be added to your HP gauge while you're Invincible.
New Abnormal Status: Rupture

A new Abnormal Status, <Rupture>, will be added.
This is a Neutralize-type Abnormal Status effect that increases the overall incoming damage for its duration.
- Rupture applies to monsters, regardless of their Neutralize status.

Rupture stacks up to 3 times, increasing incoming damage per stack.
- Removed after its duration.
- An additional application of Rupture after 3 stacks renews the 3 Stacks effect.
- Applied to characters and monsters at different values.
<Rupture Stack Effect: Character>
|
Category
|
Stage
|
Effect
|
|
Rupture
|
1
|
Overall Incoming Damage +25%
|
|
2
|
Overall Incoming Damage +50%
|
|
3
|
Overall Incoming Damage +75%
|
<Rupture Stack Effect: Monster>
|
Category
|
Stage
|
Effect
|
|
Rupture
|
1
|
Overall Incoming Damage +5%
|
|
2
|
Overall Incoming Damage +7%
|
|
3
|
Overall Incoming Damage +8%
|
Items and skills that remove Abnormal Status effects will remove all Rupture effects.
Rupture will be removed at the end of its duration, regardless of stacks.
Existing Abnormal Status Updates
Moved the existing Abnormal Status Damage Bonus options to the existing default Equipment options.
Removed the Abnormal Status Damage Bonus options by Abnormal Status stacks.
Removed the Conditional Damage Bonus options from Neutralize-type Abnormal Status effects.
|
Category
|
Abnormal Status
|
Changes
|
|
Damage-type Abnormal Status
|
Poison
|
Removed Damage Bonus options by Poison stacks.
|
|
Burn
|
Removed Damage Bonus options by Burn stacks.
Removed Damage Bonus options by adding Burn during Freeze.
|
|
Shock
|
Removed Damage Bonus options by Shock stacks.
|
|
Bleeding
|
Removed Damage Bonus options by Bleeding stacks.
|
|
Neutralize-type Abnormal Status
|
Freeze
|
Removed Damage Bonus options by adding Freeze during Burn.
|
|
Sleep
|
Removed Damage Bonus options by Sleep stacks.
|
Monster HP UI Renewal

HP UI Improved
The basic organization and appearance of the Monster HP UI will be improved.
- The HP bar will be divided into blocks, with the total amount of HP displayed in % in the center.
- The UI will now change to decrease the HP gauge based on the %.
- Removed monster species labeling.
HP Shake Improvements
The HP UI will now fine-tune the shake based on damage intensity.
Abnormal Status Representation Improvements
Improved the display of the Invincibility and Hold effects.
Normal Monster HP
In addition to the HP UI display, HP will be simply displayed at the top of Normal monsters.
- Only the remaining HP will be indicated.
This system can be turned on or off in Settings.
- Off by default (No checkbox)
|
Normal Monster HP Settings
|
Monster Top Display
|
|

|

|
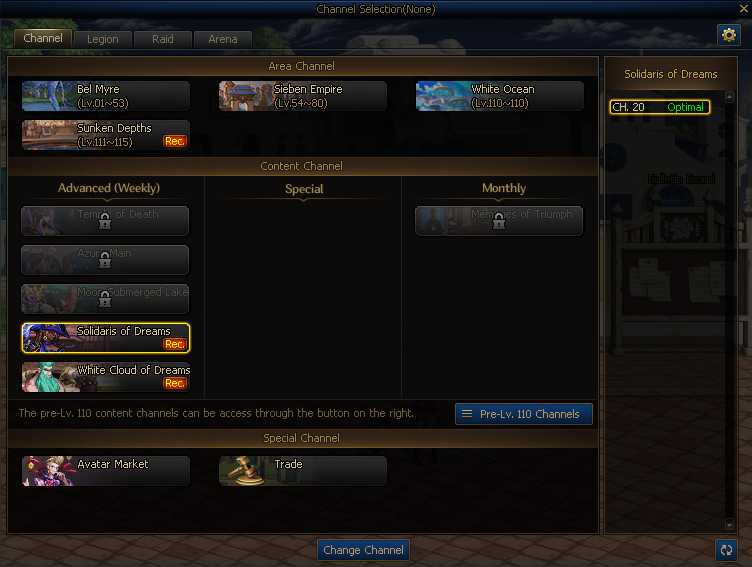
Advanced Dungeon
Advanced Dungeon Exclusive Channels
A dedicated channel will be created for each Advanced Dungeon.
You can now only create parties and play Advanced dungeons in the dedicated channel for that dungeon.
Create Party
Each Advanced dungeon has an exclusive town, where you can create a party and enter through a dedicated NPC located there.
- Dedicated NPC

- Create Party Window

In the dedicated channel, your Party portrait will display your available Advanced Dungeon Entry count and Special Reward count.

Dedicated Lobby
After you create a party, you can recruit for your party and wait in the dedicated lobby.

You can start the Advanced Dungeon through the dedicated NPC's menu in the lobby.

Content Status

You can use the Content Status to see how many times you can enter each Advanced Dungeon and the maximum Weekly Special rewards for the Sunken Depths Advanced Dungeons.
Recommended Advanced Dungeons
Advanced Dungeons that match your Fame can be found through the Recommended mark in the Adventure Navigator or the Channel Selection window.
It is advised for you to enter the recommended dungeons to earn rewards that match your Fame.
Adventure Navigator

Channel Selection Window

Weekly Special Rewards
Sunken Depths Advanced Dungeons share Integrated Advanced Dungeon Reward count, and you can get a reward up to twice a week per character.
<Advanced Dungeon> Moon-Submerged Lake

The <Moon-Submerged Lake> Advanced Dungeon content will be added.
Content Entry
Complete the Act quest, The Behemoth's Charge, to enter the Advanced Dungeon channel, <Moon-Submerged Lake>.
- The <Moon-Submerged Lake> channel requires 34,749 or higher Fame.
<Moon-Submerged Lake> is open on all days of the week.
You can enter the content through NPC Moon Hunter Vezzlo in the <Moon-Submerged Lake> channel.
- You can create a party through NPC Moon Hunter Vezzlo or the Create Party button in the Look for Party UI.
- After creating or joining a party, move to the right side and start the content through NPC Moon Hunter Vezzlo or the portal on the right.
Content Info
|
Category
|
Description
|
|
Create Party Window
|
 |
|
Entry Level
|
115 or above
|
|
Recommended Party Size
|
1 or 4
|
|
Entry Fame
|
34,749
|
|
Entry Fatigue Cost
|
30
|
|
Weekly Entry Limit
|
1
Your Weekly Entry count will be decreased at the beginning of the content.
|
|
Integrated Reward Count
|
2
Clear the content within the time limit to receive the Weekly reward.
Your Integrated Reward count will be decreased upon claiming the reward.
Weekly Entry limits and Integrated Reward count will be reset weekly on Tuesday at 09:00 UTC.
|
Content Rules
Restrictions
A 20-minute limit is applied upon entering the dungeon.
- If you exceed the time limit, you will fail and be automatically removed from the dungeon.
Puppet items are restricted.
You have a default limit of 4 Life Tokens and share the usage count with your party members.
- Additional usage count of 4 Life Tokens can be obtained during dungeon progression.
- Skill cooldown will not be reset when you use Life Tokens in dungeons.
Content Failure
Being unable to defeat the Final Boss monster within the time limit will result in failure.
Abandon/Resume Mission
The party leader can retreat from the dungeon using the Retreat button on the mini-map.
- If you retreat, you'll receive penalty time.
After retreating, the party leader can abandon or resume the content through NPC Moon Hunter Vezzlo.
If you resume, you can restart at the starting point of your last map.
Abandoning the mission requires a vote, and the entire party must agree unanimously.
- If you abandon a mission, all your dungeon progress will be reset and your Weekly Entry count will be restored.
Area Buff
The Area buff, Ongoing Legacy, will be added.
- The Ongoing Legacy buff will be applied in the <Moon-Submerged Lake> channel.
- It increases STR and INT upon entering dungeons.
- The stat increase from the Ongoing Legacy buff won't affect Buffer characters' Buff skills.
Content Summary
In Moon-Submerged Lake, you'll battle Malefic Beasts in a vast field, and travel the Path to Demise through the Guiding River to the Fount of Tribulation.
Defeat Troops

You can move to the next room without defeating all Normal monsters.
- Information about the currently defeated monsters will be displayed on the Status Board.
- Normal monsters that you haven't defeated will appear in the next room.
Named and Boss Monster maps require all Normal monsters to be defeated to enter.
The number of monsters rounded up currently will be displayed.
- When the maximum number of monsters is gathered, you can't move rooms.
The more Normal monsters there are in the map, the more powerful abilities you gain.
|
10 - 19 Monsters
|
20 - 29 Monsters
|
30 or More Monsters
|
|
Incoming damage -40%/Atk. +50%
|
Incoming damage -60%/Atk. +100%
Super Armor
|
Incoming damage -80%/Atk. +150%
Cannot Be Held effect applied
|
Moon Hunter's Triumph

Moon Hunters will support you when you defeat Normal monsters.
- The more monsters you defeat at once, the more gauge you can gain.
Available with the keys assigned to the Elite Member Mode/Raid Special keys.
- Default: `, (, ~, and )
- Changing the Hotkey settings will also change the tooltip.
Temporarily increases all players' Overall Damage by 50% when used.
<Moon-Submerged Lake> Upper Level

Depending on your current location, the upper level is divided into the Moon Hunter Camp, Moon-Submerged Lake, and the Starfall Forest ecosystems.
You must defeat the Maleficents in 2 of the 3 areas and pass Camerin's test before you can move to the lower level.
When you enter an ecosystem, you must summon and defeat a Named monster to move to another ecosystem.
When you summon a Named monster by defeating a set number of Normal monsters, a Named monster that is specific to that ecosystem will appear.
- Moon Hunter Camp → Cheshire the Copycat
- Moon-Submerged Lake → Sowing Murk
- Starfall Forest → Grailo the Logger
Camerin's Hiding Place
- Each ecosystem has Camerin's Hiding Place, indicated by a glowing border on the Status Board.
- When you summon a Named Monster in Camerin's Hiding Place, Camerin will appear to help you in battle.
<Moon-Submerged Lake> Lower Level

In the lower level, you'll chase down and fight Zermio, and then face Crimson Tooth Wulard.
<Advanced Dungeon> Azure Main

The <Azure Main> Advanced Dungeon content will be added.
Content Entry
Complete the Act quest, The Behemoth's Charge, to enter the Advanced Dungeon channel, <Azure Main>.
- The <Azure Main> channel requires 44,929 or higher Fame.
The <Azure Main> is open on all days of the week.
You can enter the content through NPC Circuit Engineer Nerimo in the <Azure Main> channel.
- You can create a party through NPC Circuit Engineer Nerimo or the Create Party button in the Look for Party UI.
- After creating or joining a party, move to the left side and start exploring through NPC Circuit Engineer Nerimo or the portal on the left.
Content Info
|
Category
|
Description
|
|
Create Party Window
|

|
|
Entry Level
|
115 or above
|
|
Recommended Party Size
|
1 or 4
|
|
Entry Fame
|
44,929
|
|
Entry Fatigue Cost
|
30
|
|
Weekly Entry Limit
|
1
Your Weekly Entry count will be decreased at the beginning of the content.
|
|
Integrated Reward Count
|
2
Clear the content within the time limit to receive the Weekly reward.
Your Integrated Reward count will be decreased upon claiming the reward.
Weekly Entry limits and Integrated Reward count will be reset weekly on Tuesday at 09:00 UTC.
|
Content Rules
Restrictions
A 20-minute limit is applied upon entering the dungeon.
- If you exceed the time limit, you will fail and be automatically removed from the dungeon.
Puppet items are restricted.
You have a default limit of 8 Life Tokens and share the usage count with your party members.
- Skill cooldown will not be reset when you use Life Tokens in dungeons.
Content Failure
Being unable to defeat the Final Boss monster within the time limit will result in failure.
Abandon/Resume Mission
The party leader can retreat from the dungeon using the Retreat button on the mini-map.
- If you retreat, you'll receive penalty time.
After retreating, the party leader can abandon or resume the content through NPC Circuit Engineer Nerimo.
If you resume, you can restart at the starting point of your last map.
Abandoning the mission requires a vote, and the entire party must agree unanimously.
- If you abandon a mission, all your dungeon progress will be reset and your Weekly Entry count will be restored.
Area Buff
The Area buff, Ongoing Legacy, will be added.
- The Ongoing Legacy buff will be applied in the <Azure Main> channel.
- It increases STR and INT upon entering dungeons.
- The stat increase from the Ongoing Legacy buff won't affect Buffer characters' Buff skills.
Content Summary
The Advanced Dungeon, Azure Main, is a mission to defeat Kraken the Horn Beast and retake the mothership, which will take you through the Cruel Beast to the Azure Main.
Kraken roams the Azure Main and engages in combat. Depending on the situation, you can leverage its attacks to gain an advantage in the dungeon.
|
Cruel Beast
|
Azure Main
|
|

|

|
On the Cruel Beast, you must help the ally NPC Maleficence Slayer Rayron and the other Maleficence Raiders destroy Kraken and its parasites that have attacked the ship.
- When you destroy all of Kraken's tentacles while fending off the parasites that come at Rayron, you'll enter the Azure Main.
The Azure Main has 3 core facilities: the Armory, the Wheelhouse, and the Deck.
- 2 of the core facilities are randomly occupied by Anchoring Huleeze and Struggling Meliona.
After defeating both Anchoring Huleeze and Struggling Meliona, you can enter the Engine Room.
Defeating Sonic Boom Crassimor and Horn Beast Kraken that occupy the Engine Room will clear the dungeon.
Facility Reclamation Buff

When you clear a core Facility on the Azure Main, your companions will reclaim that core facility, granting you a Facility Reclamation buff.
- The Rapid Wind buff is awarded for clearing the Cruel Beast.
All acquired Facility Reclamation buffs will be automatically activated when Horn Beast Kraken becomes Groggy.
When the Facility Reclamation buffs are activated, the companions who have reclaimed the facilities will assist you, providing different benefits for a while.
|
Facility Reclamation Buff
|
Reclaimed Map
|
Effect
|
|
Rapid Wind
|
Cruel Beast
|
Yujin supports you.
* Increases party members' speed.
* All speed +75%
|
|
Barrage
|
Armory
|
Rayron supports you after reclaiming the Armory.
* Fires a massive harpoon at Kraken.
* Decreases Kraken's HP.
|
|
Gear Acceleration
|
Wheelhouse
|
Nerimo supports you after reclaiming the Wheelhouse.
* Increases party members' Atk.
* Atk. +30%
|
|
Emergency Supply
|
Deck
|
Aruz supports you after reclaiming the Deck.
* Decreases party members' cooldown.
* Cooldown -50%
|
<Advanced Dungeon> Temple of Death

The <Temple of Death> Advanced Dungeon content will be added.
Content Entry
Complete the Act quest, The Behemoth's Charge, to enter the Advanced Dungeon channel, <Temple of Death>.
- The <Temple of Death> channel requires 48,988 or higher Fame.
The <Temple of Death> is open on all days of the week.
You can enter the content through NPC Kind Death Cenir in the <Temple of Death> channel.
- You can create a party through NPC Kind Death Cenir or the Create Party button in the Look for Party UI.
- After creating or joining a party, move to the left side and start exploring through NPC Kind Death Cenir or the portal on the left.
Content Info
|
Category
|
Description
|
|
Create Party Window
|

|
|
Entry Level
|
115 or above
|
|
Recommended Party Size
|
1 or 4
|
|
Entry Fame
|
48,988
|
|
Entry Fatigue Cost
|
30
|
|
Weekly Entry Limit
|
1
Your Weekly Entry count will be decreased at the beginning of the content.
|
|
Integrated Reward Count
|
2
Clear the content within the time limit to receive the Weekly reward.
Your Integrated Reward count will be decreased upon claiming the reward.
Weekly Entry limits and Integrated Reward count will be reset weekly on Tuesday at 09:00 UTC.
|
Content Rules
Restrictions
A 20-minute limit is applied upon entering the dungeon.
- If you exceed the time limit, you will fail and be automatically removed from the dungeon.
Puppet items are restricted.
You have a default limit of 8 Life Tokens and share the number with your party members.
- Skill cooldown will not be reset when you use Life Tokens in dungeons.
Content Failure
Being unable to defeat the Final Boss monster within the time limit will result in failure.
Abandon/Resume Mission
The party leader can retreat from the dungeon using the Retreat button on the mini-map.
- If you retreat, you'll receive penalty time.
After retreating, the party leader can abandon or resume the content through NPC Kind Death Cenir.
If you resume, you can restart at the starting point of your last map.
Abandoning the mission requires a vote, and the entire party must agree unanimously.
- If you abandon a mission, all your dungeon progress will be reset and your Weekly Entry count will be restored.
Area Buff
The Area buff, Ongoing Legacy, will be added.
- The Ongoing Legacy buff will be applied in the <Temple of Death> channel.
- It increases STR and INT upon entering dungeons.
- The stat increase from the Ongoing Legacy buff won't affect Buffer characters' Buff skills.
Content Summary
You must stop the Maleficents that are heading to the temple of the goddess and reach its interior before they do.
The path to the temple is very difficult, but you can make it easier by defeating many of the Maleficents around you and by utilizing the various hidden elements inside the mysterious temple.
Cards of Fate
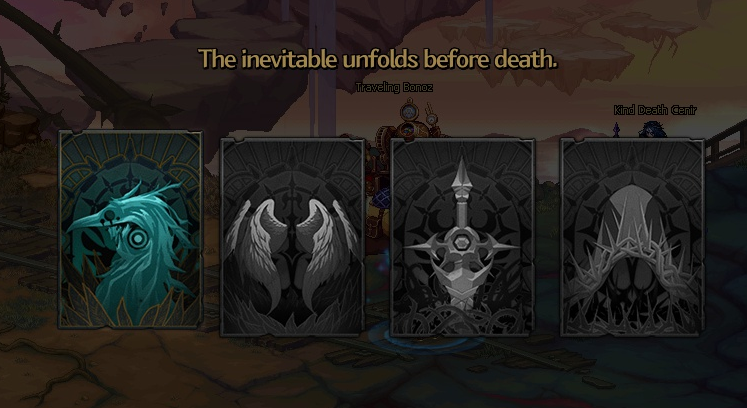
After you start the content, four cards will be displayed, showing the combat characteristics of each monster.
- The cards are randomized each time, and only cards for monsters that must be defeated sequentially will be activated first.
ㄴ Each time you defeat a monster, the next monster's card will be activated.
- Depending on the card's effect, new experiences and strategies become available.
- Card-specific effects are applied when you battle each monster.
Some monsters must be defeated before you can encounter the Final Boss monster, and you can choose to defeat other monsters to utilize them in various ways.
Morale System

In the Temple of Death, you will be affected by the Morale system when battling monsters.
Each monster has a Morale Level, which can be an advantage or disadvantage to you, depending on how high or low it is.
Players will start at Level 1 by default, and will gain Morale for each monster they defeat.
Depending on the situation, you can strategically utilize the above system to gain a more favorable battle.
<Temple of Death> Shimmering Archipelago

Time Attack will be activated in the Shimmering Archipelago area.
You must clear the archipelago within the time limit, and if you fail, the Veroro monster will appear in the Hushed Corridor area.
- This is a must-kill monster and should be your first priority in the Corridor.
You can enter the Hushed Corridor after defeating Camirak the Omen Bird.
<Temple of Death> Hushed Corridor

In the Hushed Corridor area, Survival Support will appear in randomized locations.
Up to 5 Support effects can be obtained, and they're optional.
They provide various effects or buffs, and can be used as additional strategies.
Defeating Flawless Death Vissima located deep in the Corridor will clear the dungeon.
<Advanced Dungeon> Memories of White Sea
- When you clear the quest, you can enter the White Cloud Valley of Dreams and Solidaris of Dreams channel.
You can create a party through NPC Mistdream Regulator in the Advanced Dungeon (Weekly) - White Cloud Valley of Dreams and Solidaris of Dreams channel.
- After creating or joining a party, move to the Mistdream Chamber in the center and start exploring through each content's NPC.
Memories of White Sea: Weekly Reward limits are applied per account.
- The Weekly Reward count for White Cloud Valley of Dreams and Solidaris of Dreams is limited to 20 per account each.
- Accounts that have exhausted their Weekly Reward count will be restricted from playing for that week.
- You can check your Account Reward count on the top right UI when you enter the channel.
White Cloud Valley of Dreams
Content Info
|
Category
|
Description
|
|
Create Party Window
|

|
|
Entry Level
|
115 or above
|
|
Recommended Party Size
|
1 or 4
|
|
Entry Fame
|
16,316
|
|
Entry Fatigue Cost
|
30
|
|
Weekly Entry Limit
|
1
Your Weekly Entry count will be decreased at the beginning of the content.
|
|
Integrated Reward Count
|
2 (20 weekly per account)
Clear the content within the time limit to receive the Weekly reward.
Your Integrated Reward count will be decreased upon claiming the reward.
Weekly Entry limits and Integrated Reward count will be reset weekly on Tuesday at 09:00 UTC.
|
Content Rules
Time Limit
A 30-minute limit is applied upon starting the content.
As long as you don't leave the party, you can continue to challenge for the duration of the time limit.
Content Failure
Being unable to defeat the Final Boss, Elder Luton, within the time limit will result in failure.
Abandon and Retreat from a Mission
The party leader can retreat from the dungeon using the Retreat button on the mini-map.
- If you retreat, you can't re-enter the dungeon for a while.
After retreating, you can select Abandon Mission through NPC Elder Luton.
If you abandon a mission, all your progress in the dungeon will be reset, and the consumed entry will not be returned.
Combat Restrictions
Puppet items are restricted.
You have a default limit of 4 Life Tokens and share the usage count with your party members.
- All party members will automatically resurrect after defeating Named and Boss Monsters, and the Life Token limit will be reset.
- Skill cooldown will not be reset when you use Life Tokens in dungeons.

After entering the content, you can track your progress through the dungeon using the Status Board.
A special object, the Mist Collector, will be available in dungeons. You can collect Mist Energy in the Mist Collector by defeating monsters and use it to your advantage in battle.

Dungeon Progress
Subdue monsters to increase your progress through the dungeon.
New Boss monsters will be unlocked based on your dungeon progress.
At the maximum dungeon progression, the Final Boss, Elder Luton, will be unlocked.
Mist Collector
A special object, the Mist Collector, collects Mist Energy when you fight a Named/Boss monster.
Approach the Mist Collector and use the Dungeon Special key to carry and set it up.
- Up to one person can have a Mist Collector.
At the maximum amount of collected Mist Energy, it can be installed to significantly reduce the Neutralize Gauge of a monster.
Solidaris of Dreams
Content Info
|
Category
|
Description
|
|
Create Party Window
|

|
|
Entry Level
|
115 or above
|
|
Recommended Party Size
|
1 or 4
|
|
Entry Fame
|
23,016
|
|
Entry Fatigue Cost
|
30
|
|
Weekly Entry Limit
|
1
Your Weekly Entry count will be decreased at the beginning of the content.
|
|
Integrated Reward Count
|
2 (20 weekly per account)
Clear the content within the time limit to receive the Weekly reward.
Your Integrated Reward count will be decreased upon claiming the reward.
Weekly Entry limits and Integrated Reward count will be reset weekly on Tuesday at 09:00 UTC.
|
Content Rules
Time Limit
A 30-minute limit is applied upon starting the content.
As long as you don't leave the party, you can continue to challenge for the duration of the time limit.
Content Failure
Being unable to defeat the Final Boss, Bluehawk Captain Birdie, within the time limit will result in failure.
Abandon and Retreat from a Mission
The party leader can retreat from the dungeon using the Retreat button on the mini-map.
- If you retreat, you can't re-enter the dungeon for a while.
After retreating, you can select Abandon Mission through NPC Bowmaster Ludmilla.
If you abandon a mission, all your progress in the dungeon will be reset, and the consumed entry will not be returned.
Combat Restrictions
Puppet items are restricted.
You have a default limit of 4 Life Tokens and share the usage count with your party members.
- All party members will automatically resurrect after defeating Named and Boss Monsters, and the Life Token limit will be reset.
- Skill cooldown will not be reset when you use Life Tokens in dungeons.
How to Play

After entering the content, you can use the mini-map to view your route through the dungeon.

After clearing each ship, you can go to the bow and select the next ship to proceed to.

By destroying each ship, you can board the captain's ship, the Bluenaught, at the end.
You can meet Bluehawk Captain Birdie on the captain's ship, the Bluenaught.
Support Buffs

During combat, you can receive a Support effect that helps you progress through the dungeon.
A total of 4 different effects are available, and once obtained, they're permanent until the dungeon is cleared.
|
No.
|
Buff Name
|
Buff Image
|
Buff Effect
|
|
1
|
Morale Boost
|

|
Overall Damage +50%
|
|
2
|
Time to Replenish
|

|
Skill cooldown -50%
|
|
3
|
Swift Movement
|

|
Attack /Casting Speed +30% and Movement Speed +50%
|
|
4
|
Nature's Protection
|

|
HP +2% of outgoing damage
|
Expected Reward Ratio
An icon will be added to the Expected Reward UI portion of the Sunken Depths dungeon to indicate reward efficiency between dungeons.

Advanced Dungeon Rewards
Clear Rewards
You can get the following items upon clearing the dungeons, according to each of their rates.
All rewards in Advanced Dungeons appear as Clear Rewards.
|
Obtainable Item
|
Description
|
Tradability
|
|
 Merchant Guild Silver Coin Merchant Guild Silver Coin
|
Used to buy new items.
|
Account-bound
|
|
 Doom Oracle Doom Oracle
|
Used to enter the Disciple of Doom dungeon.
|
Untradable
|
|
 Set Equipment Set Equipment
|
1 per weapon type
1 per Armor/Accessory/Special Equipment part
|
Untradable
|
|
 Unique Equipment Unique Equipment
|
1 per weapon type
12 per Armor/Accessory/Special Equipment part
|
Untradable
|
|
 Legendary Equipment Legendary Equipment
|
2 per weapon type
12 per Armor/Accessory/Special Equipment part
|
Untradable
|
|
 Epic Equipment Epic Equipment
|
2 per weapon type
12 per Armor/Accessory/Special Equipment part
|
Untradable
|
|
 Primeval Equipment Primeval Equipment
|
2 per weapon type
12 per Accessory part
|
Untradable
|
|
 Sunken Depths Advanced Dungeon Distinct Equipment Pot Sunken Depths Advanced Dungeon Distinct Equipment Pot
|
Contains 1 Sunken Depths Distinct Equipment item, according to each of their rates.
|
Untradable
|
|
 Monster Card (Legendary/Unique) Monster Card (Legendary/Unique)
|
A new Sunken Depths Enchantment Card
|
Tradable once
(Account-bound after trade)
|
|
 Dark Fragmented Abyss Unique Equipment Dark Fragmented Abyss Unique Equipment
|
64 per Armor/Accessory/Special Equipment part
|
Tradable once
(Account-bound after trade)
(Untradable once equipped)
|
Courier Bannibou Shop
When you clear a dungeon, the Courier Bannibou NPC has a chance to appear.
You can buy the following items from NPC Courier Bannibou.
|
Purchasable Item
|
Description
|
Tradability
|
|
 Materialized Malefic Clue Materialized Malefic Clue
|
Use to enter the Annihilate the Maleficents dungeon.
|
Tradable
|
|
 Black Fang Epic Conversion Scroll Pot Black Fang Epic Conversion Scroll Pot
|
Contains 1 Black Fang Epic Conversion Scroll of a random set, all at the same rate.
<Black Fang Epic Conversion Scroll>
Converts a Lv. 115 Set Epic accessory into a Black Fang Set Epic accessory.
Required Materials
- 1 Set Epic accessory that matches the conversion scroll
- 3 Epic Souls
- 500 Malefic Residue
- 2,200,000 Gold
|
Tradable once
(Account-bound after trade) |
|
 Black Fang Primeval Conversion Scroll Pot Black Fang Primeval Conversion Scroll Pot
|
Contains 1 Black Fang Primeval Conversion Scroll of a random set, all at the same rate.
<Black Fang Primeval Conversion Scroll>
Converts a Lv. 115 Set Primeval accessory into a Black Fang Set Primeval accessory.
Required Materials
- 1 Set Primeval accessory that matches the conversion scroll
- 1 Primeval Soul
- 4,000 Malefic Residue
- 12,000,000 Gold
|
Account-bound
|
|
 Lv. 115 Set Legendary Equipment Pot Selection Box Lv. 115 Set Legendary Equipment Pot Selection Box
|
Contains a Lv. 115 Set Legendary Equipment Pot for a set of your choice.
10 Legendary Souls are required to open the pot.
|
Account-bound
|
|
 Lv. 115 Set Epic Equipment Pot Selection Box Lv. 115 Set Epic Equipment Pot Selection Box
|
Contains a Lv. 115 Set Epic Equipment Pot for a set of your choice.
10 Epic Souls are required to open the pot.
|
Account-bound
|
Gaze of the Maleficents

6 new dungeons will be added to the Inae, Crimson Mine Village, and Sanctuary of Scattered Stars areas of Sunken Depths.
Complete the Level 115 Act quest, The Behemoth's Charge, to enter the dungeons.

Limited Mission dungeons in Daily Missions will be enhanced by the Gaze of the Maleficents, and each character can only play each dungeon once.
- The number of characters is limited to 20.
- If you have not reached 13,195 Fame, the Gaze of the Maleficents Dungeon missions will not appear.
Upon entering the Gaze of the Maleficents dungeon, your character will be bound to the Daily mission.
- Once 20 characters are bound, the Gaze of the Maleficents dungeon will not appear.
- But if any of the bound characters have not yet cleared the dungeon, then it will appear for them.
When the dungeon is cleared, it will change to a Normal dungeon.
Content Info
Dungeon Entry Level: 115
Entry Fame: 13,195
Daily Reward Limit: 1
Fatigue Cost: 2 per room
Party Mode: Available
Entry Materials: None
Gaze of Malefic Energy
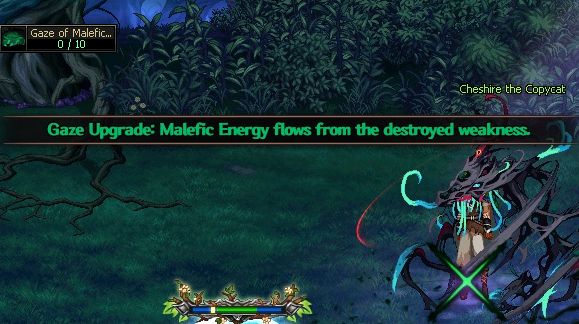
Gaze of Malefic Energy will be activated 25 sec. after entering the dungeon.
When Gaze of Malefic Energy is activated, a Gaze mark will be placed on the monster every 5.5 seconds, which can be reduced up to every 4 seconds depending on how many times Named or Boss Monsters are hit.
The mark will be destroyed on hit and the following effects will be applied to the monster and the player.
- Monster
ㄴ Incoming damage +50%
ㄴ Loses HP and Neutralize Gauge when hit, proportional to the Gaze value.
- Player
ㄴ Incoming damage +10%
The Gaze effect stacks up to 10 times and is also applied to subsequent encounters.
Gaze of the Maleficents Rewards
Clear Rewards
You'll get the following items from the Clear reward, according to each of their rates.
|
Obtainable Item
|
Description
|
Tradability
|
|
 Digming's Fur Ball Digming's Fur Ball
|
A tangled ball of fur that fell from Digming's store of treasure.
Each Digming has its own favorite treasures, so digging through its fur will reveal what they are.
|
Untradable
|
|
Rare Equipment
|
1 per weapon type
1 per Armor/Accessory/Special Equipment part
|
Untradable
|
|
Unique Equipment
|
1 per weapon type
12 per Armor/Accessory/Special Equipment part
|
Untradable
|
|
Legendary Equipment
|
2 per weapon type
12 per Armor/Accessory/Special Equipment part
|
Untradable
|
|
Epic Equipment
|
2 per weapon type
12 per Armor/Accessory/Special Equipment part
|
Untradable
|
|
Primeval Equipment
|
2 per weapon type
12 per Accessory part
|
Untradable
|
Digming's Fur Ball Rewards
Contains a reward, according to each of their rates. Items and their chances don't vary by difficulty.
|
Obtainable Item
|
Description
|
Tradability
|
|
Monster Card (Legendary/Unique)
|
A new Sunken Depths Enchantment Card
|
Tradable (Once)
|
|
 Leiern Core Leiern Core
|
-
|
Untradable
|
|
 Harmonious Crystal Harmonious Crystal
|
-
|
Untradable
|
|
 Warlord's Cry Potion [Digming] Warlord's Cry Potion [Digming]
|
Damage +12% for 60 sec.
This effect is canceled and its cooldown is reset when you're knocked down or move to town.
Deleted on the 1st day of each month at 09:00 UTC.
|
Account-bound
|
|
 HP/MP 20% Recovery Potion HP/MP 20% Recovery Potion
|
HP/MP +20%
Deleted on the 1st day of each month at 09:00 UTC.
|
Account-bound
|
|
Merchant Guild Silver Coin
|
Used to buy the following items at the Mystical Grimoire and Kind Death Cenir NPC Shops:
* Doom Oracle
* Void Soul
* Moon-Submerged Lake Legendary Card Album
* Necklace Primeval Fusion Stone Pot
* Ring Primeval Fusion Stone Pot
* Lv. 110 Epic Fusion Stone Selection Box
* Forgotten Light
|
Account-bound
|
Courier Bannibou Secret Shop
Bannibou's Secret Shop, which has a chance of appearing when you clear dungeons, sells the following items.
|
Item Name
|
Description
|
Tradability
|
 Materialized Malefic Clue Materialized Malefic Clue |
Used to enter the Annihilate the Maleficents dungeon.
|
Tradable once
(Account-bound after trade) |
Disciple of Doom

The new Hell Party dungeon, the <Disciple of Doom>, will be added.
Content Entry
|
Category
|
Description
|
|
Entry Level
|
Lv. 112 or above
|
|
Entry Fame
|
13,632
|
|
Players
|
1 - 4 ppl
|
|
Entry Fatigue
|
8
|
|
Entry Materials
|
Doom Oracle x22
|
|
Entry Quest
|
[Episode] [Disciple of Doom] Suspicious Traveler
|
|
Entry Location
|
Crimson Mine Village
|
New Systems Applied
1) Seamless Loading
Instead of pressing the Retry button, simply moving in the direction you were traveling will start the new Hell Party dungeon again.
If you prefer to use the traditional Retry button, you can still use it to access the new Hell Party dungeon.
Whether you press the button or run to the right, the new dungeon will load naturally, bypassing the Loading screen and allowing for faster dungeon play.
2) Bonus Entry
When you clear Disciple of Doom multiple times, you'll earn a chance to enter it again for free.
If you earn this chance, the next Disciple of Doom you enter will not cost you any materials.
This Free Entry opportunity is limited to the Disciple of Doom only; it's not applicable to entering the Abyss: Disciple of Doom.
3) Abyssal Rift
When you play the Disciple of Doom, you'll have a chance of encountering a rift that leads to the Abyss.
If you travel through this rift to the Abyss and defeat the Disciple of Doom, you will get a reward that is more valuable than the Disciple of Doom.
4) Mystical Fortune
When you play the Disciple of Doom, you'll have a low chance of Mystical Fortune, which gives you 15x or 50x rewards.
When Mystical Fortune is applied, you will receive 15x/50x more rewards than you would have otherwise.
Doomseeker Nox
As you progress through the Disciple of Doom or the Abyss: Disciple of Doom, you'll have a low chance of encountering Nox, who is guarding a Fragment of Doom.
If you defeat Nox, you'll get the Primeval equipment he was guarding.

Disciple of Doom Rewards
Basic Rewards
You can get the following items upon clearing the dungeons, according to each of their rates:
|
Obtainable Item
|
Description
|
Tradability
|
|
Merchant Guild Silver Coin
|
Used to buy new items.
|
Account-bound
|
|
 Abyssal Doom Oracle Abyssal Doom Oracle
|
Used to enter the Abyss: Disciple of Doom dungeon.
|
Untradable
|
|
 Doom Oracle Orb Doom Oracle Orb
|
Contains 200 Doom Oracles.
|
Account-bound
|
|
Rare Equipment
|
1 per weapon type
1 per Armor/Accessory/Special Equipment part
|
Untradable
|
|
Unique Equipment
|
1 per weapon type
12 per Armor/Accessory/Special Equipment part
|
Untradable
|
|
Legendary Equipment
|
2 per weapon type
12 per Armor/Accessory/Special Equipment part
|
Untradable
|
|
Epic Equipment
|
2 per weapon type
12 per Armor/Accessory/Special Equipment part
|
Untradable
|
|
Primeval Equipment
|
2 per weapon type
12 per Accessory part
|
Untradable
|
Mystical Fortune Rewards
Playing the Disciple of Doom has a chance of a Mystical Fortune reward in addition to the basic reward:
|
Obtainable Item
|
Description
|
Tradability
|
|
Merchant Guild Silver Coin
|
Used to buy new items.
|
Account-bound
|
|
 Rare Soul Rare Soul
|
Obtainable from disassembled Lv. 115 or above Rare equipment.
Used to buy new items and use new systems.
|
Account-bound
|
|
Unique Equipment
|
1 per weapon type
12 per Armor/Accessory/Special Equipment part
|
Untradable
|
|
Legendary Equipment
|
2 per weapon type
12 per Armor/Accessory/Special Equipment part
|
Untradable
|
|
Epic Equipment
|
2 per weapon type
12 per Armor/Accessory/Special Equipment part
|
Untradable
|
|
Primeval Equipment
|
2 per weapon type
12 per Accessory part
|
Untradable
|
Abyssal Rift Reward
Playing the Disciple of Doom has a chance of triggering the Abyssal Rift.
When it appears, you'll have a set chance of getting exclusive rewards, while the basic and Mystical Fortune rewards will not appear.
|
Obtainable Item
|
Description
|
Tradability
|
|
Merchant Guild Silver Coin
|
Used to buy new items.
|
Account-bound
|
|
Rare Soul
|
Obtainable from disassembled Lv. 115 or above Rare equipment.
Used to buy new items and use new systems.
|
Account-bound
|
|
 Unique Soul Unique Soul
|
Obtainable from disassembled Lv. 115 or above Unique equipment.
Used to buy new items and use new systems.
|
Account-bound
|
|
 Legendary Soul Legendary Soul
|
Obtainable from disassembled Lv. 115 or above Legendary equipment.
Used to buy new items and use new systems.
|
Account-bound
|
|
 Epic Soul Epic Soul
|
Obtainable from disassembled Lv. 115 or above Epic equipment.
Used to buy new items and use new systems.
|
Account-bound
|
|
 Primeval Soul Primeval Soul
|
Obtainable from disassembled Lv. 115 or above Primeval equipment.
Used to buy new items and use new systems.
|
Account-bound
|
Abyss: Disciple of Doom

The new Advanced Hell Party dungeon, the <Abyss: Disciple of Doom>, will be added.
Various systems that are applied to the <Disciple of Doom> are not applied to the <Abyss: Disciple of Doom>.
Content Entry
|
Category
|
Description
|
|
Entry Level
|
Lv. 112 or above
|
|
Entry Fame
|
13,632
|
|
Players
|
1 - 4 ppl
|
|
Entry Fatigue
|
60
|
|
Entry Materials
|
Abyssal Doom Oracle x120
|
|
Entry Quest
|
[Episode] [Disciple of Doom] Suspicious Traveler
|
|
Entry Location
|
Crimson Mine Village
|
New Systems Applied
1) Set Targeting
When you select the button for the desired set and enter, you can obtain equipment from the corresponding set.
When entering as a party, each party member can select the set that they want.
2) Earn the Results of Multiple Playthroughs
You can earn the rewards of multiple playthroughs of the Disciple of Doom in a single run.
3) Legendary Ensured
As a high-cost dungeon, it offers at least 1 piece of Legendary or better equipment without fail.
Abyss: Disciple of Doom Rewards
You can get the following rewards upon clearing the dungeon, according to each of their rates.
Before entering the dungeon, you can select 1 of 4 buttons, and depending on which button you select, you can get different rewards.
|
Selected Button
|
Obtainable Item
|
Description
|
Tradability
|
|

|
Merchant Guild Silver Coin
|
Used to buy new items.
|
Account-bound
|
|
Rare Equipment
|
1 per weapon type
1 per Armor/Accessory/Special Equipment part
|
Untradable
|
|
 Unique Equipment Unique Equipment
|
1 per weapon type
3 per Set Armor/Accessory/Special Equipment part among the following
* Hideout's Endless Gold Set
* Dragon Arena Uprising Set
* Serendipity Set
|
Untradable
|
|
 Legendary Equipment Legendary Equipment
|
2 per weapon type
3 per Set Armor/Accessory/Special Equipment part among the following
* Hideout's Endless Gold Set
* Dragon Arena Uprising Set
* Serendipity Set
|
Untradable
|
|
 Epic Equipment Epic Equipment
|
2 per weapon type
3 per Set Armor/Accessory/Special Equipment part among the following
* Hideout's Endless Gold Set
* Dragon Arena Uprising Set
* Serendipity Set
|
Untradable
|
|
 Primeval Equipment Primeval Equipment
|
2 per weapon type
3 per Set Accessory part among the following
* Hideout's Endless Gold Set
* Dragon Arena Uprising Set
* Serendipity Set
|
Untradable
|
|

|
Merchant Guild Silver Coin
|
Used to buy new items.
|
Account-bound
|
|
Rare Equipment
|
1 per weapon type
1 per Armor/Accessory/Special Equipment part
|
Untradable
|
|
 Unique Equipment Unique Equipment
|
1 per weapon type
3 per Set Armor/Accessory/Special Equipment part among the following
* Cleansing Darkness Set
* Beyond Limit Energy Set
* Magic Domain Set
|
Untradable
|
|
 Legendary Equipment Legendary Equipment
|
2 per weapon type
3 per Set Armor/Accessory/Special Equipment part among the following
* Cleansing Darkness Set
* Beyond Limit Energy Set
* Magic Domain Set
|
Untradable
|
|
 Epic Equipment Epic Equipment
|
2 per weapon type
3 per Set Armor/Accessory/Special Equipment part among the following
* Cleansing Darkness Set
* Beyond Limit Energy Set
* Magic Domain Set
|
Untradable
|
|
 Primeval Equipment Primeval Equipment
|
2 per weapon type
3 per Set Accessory part among the following
* Cleansing Darkness Set
* Beyond Limit Energy Set
* Magic Domain Set
|
Untradable
|
|

|
Merchant Guild Silver Coin
|
Used to buy new items.
|
Account-bound
|
|
Rare Equipment
|
1 per weapon type
1 per Armor/Accessory/Special Equipment part
|
Untradable
|
|
Unique Equipment
|
1 per weapon type
3 per Set Armor/Accessory/Special Equipment part among the following
* Soul Fairy Set
* Ancient Battlefield Valkyrie Set
* Ethereal Orb Arts Set
|
Untradable
|
|
Legendary Equipment
|
2 per weapon type
3 per Set Armor/Accessory/Special Equipment part among the following
* Soul Fairy Set
* Ancient Battlefield Valkyrie Set
* Ethereal Orb Arts Set
|
Untradable
|
|
Epic Equipment
|
2 per weapon type
3 per Set Armor/Accessory/Special Equipment part among the following
* Soul Fairy Set
* Ancient Battlefield Valkyrie Set
* Ethereal Orb Arts Set
|
Untradable
|
|
Primeval Equipment
|
2 per weapon type
3 per Set Accessory part among the following
* Soul Fairy Set
* Ancient Battlefield Valkyrie Set
* Ethereal Orb Arts Set
|
Untradable
|
|

|
Merchant Guild Silver Coin
|
Used to buy new items.
|
Account-bound
|
|
Rare Equipment
|
1 per weapon type
1 per Armor/Accessory/Special Equipment part
|
Untradable
|
|
 Unique Equipment Unique Equipment
|
1 per weapon type
3 per Set Armor/Accessory/Special Equipment part among the following
* Death in the Shadows Set
* Overwhelming Nature Set
* Alpha of the Pack Hunt Set
|
Untradable
|
|
 Legendary Equipment Legendary Equipment
|
2 per weapon type
3 per Set Armor/Accessory/Special Equipment part among the following
* Death in the Shadows Set
* Overwhelming Nature Set
* Alpha of the Pack Hunt Set
|
Untradable
|
|
 Epic Equipment Epic Equipment
|
2 per weapon type
3 per Set Armor/Accessory/Special Equipment part among the following
* Death in the Shadows Set
* Overwhelming Nature Set
* Alpha of the Pack Hunt Set
|
Untradable
|
|
 Primeval Equipment Primeval Equipment
|
2 per weapon type
3 per Set Armor/Accessory/Special Equipment part among the following
* Death in the Shadows Set
* Overwhelming Nature Set
* Alpha of the Pack Hunt Set
|
Untradable
|
Disciple of Doom/Abyss: Disciple of Doom Shops
|
Purchasable Item
|
Description
|
Selling Price
|
Tradability
|
|
 Doom Oracle Box (2) Doom Oracle Box (2)
|
Contains 2 Doom Oracles.
|
Rare Soul x1
|
Account-bound
|
|
 Doom Oracle Box (4) Doom Oracle Box (4)
|
Contains 4 Doom Oracles.
|
Unique Soul x1
|
Account-bound
|
|
 Doom Oracle Box (30) Doom Oracle Box (30)
|
Contains 30 Doom Oracles.
|
Legendary Soul x1
|
Account-bound
|
|
 Doom Oracle Box (90) Doom Oracle Box (90)
|
Contains 90 Doom Oracles.
|
Epic Soul x1
|
Account-bound
|
|
 Doom Oracle Box (1,000) Doom Oracle Box (1,000)
|
Contains 1,000 Doom Oracles.
|
Primeval Soul x1
|
Account-bound
|
|
 Doom Oracle Box (2) Doom Oracle Box (2)
|
Contains 2 Doom Oracles.
|
Merchant Guild Silver Coin x40
|
Account-bound
|
|
Doom Oracle Box (20)
|
Contains 20 Doom Oracles.
10 purchasable per account weekly
|
Merchant Guild Silver Coin x300
|
Account-bound
|
|
 Doom Oracle Box (1) Doom Oracle Box (1)
|
Contains 1 Doom Oracle.
700 purchasable per character weekly
|
(Old) Epic Soul x1
|
Untradable
|
|
 Primeval Normal Weapon Selection Box Primeval Normal Weapon Selection Box
|
Contains a Primeval Normal weapon of your choice.
5 Primeval Souls are required for opening.
|
Prime Stella x5
Void Soul x500
|
Account-bound
|
|
Primeval Normal/Legacy Weapon Pot Weapon Type Selection Box
|
Contains a Primeval Normal/Legacy Weapon Pot of the weapon type of your choice.
5 Primeval Souls are required for opening.
1 purchasable per character monthly
|
Prime Stella x5
Void Soul x500
|
Untradable
|
|
 Unique Soul Unique Soul
|
<Main Purposes>
- To buy Doom Oracles
- To buy Void Souls
- To buy Lv. 115 Set Unique Equipment Pot Selection Boxes
- To buy Lv. 115 Set Unique Weapon Selection Boxes
- To buy Legendary Souls
- To convert equipment
- To tune/promote equipment
- To Transcend Lv. 115 or above Unique equipment
<Main Use NPCs>
- Mystical Grimoire
- Kind Death Cenir
<Main Sources>
- Lv. 115 or above Unique equipment Armory registration/disassembly
|
Rare Soul x5
|
Account-bound
|
|
 Legendary Soul Legendary Soul
|
<Main Purposes>
- To buy Doom Oracles
- To buy Epic Souls
- To convert equipment
- To tune/promote equipment
- To open Lv. 115 Set Epic Equipment Pots
- To Transcend Lv. 115 or above Legendary equipment
- To upgrade God of Mist weapons/Sacrosanct equipment
<Main Use NPCs>
- Mystical Grimoire
- Kind Death Cenir
- Inventor Rolumber
<Main Sources>
- Lv. 115 or above Legendary equipment Armory registration/disassembly
|
20 Unique Souls
|
Account-bound
|
|
 Epic Soul Epic Soul
|
<Main Purposes>
- To buy Doom Oracles
- To buy Primeval Souls
- To convert equipment
- To tune/promote equipment
- To convert to Black Fang equipment
- To open Lv. 115 Set Epic Equipment Pots
- To transcend Lv. 115 or above Epic equipment
<Main Use NPCs>
- Mystical Grimoire
- Kind Death Cenir
<Main Sources>
- Lv. 115 or above Epic equipment Armory registration/disassembly
|
Legendary Soul x20
|
Account-bound
|
|
 Primeval Soul Primeval Soul
|
<Main Purposes>
- To buy Doom Oracles
- To convert equipment
- To convert to Black Fang equipment
- To transcend Lv. 115 or above Primeval equipment
<Main Use NPCs>
- Mystical Grimoire
- Kind Death Cenir
<Main Sources>
- Lv. 115 or above Primeval equipment Armory registration/disassembly
|
Epic Soul x20
|
Account-bound
|
|
 Dark Fragmented Abyss Selection Box Dark Fragmented Abyss Selection Box
|
Contains 1 Dark Fragmented Abyss Equipment item of your choice.
The resulting equipment is permanent and untradable.
1 purchasable per account monthly
|
Malefic Residue x500
|
Account-bound
|
|
 Malefic Residue Malefic Residue
|
<Main Purposes>
- To convert equipment
- To tune/promote equipment
- Black Fang equipment crafting material
- Creature Artifact recipe material
- NPC shop purchases
- To transcend Lv. 115 or above equipment
<Main Use NPCs>
- Kind Death Cenir
- Circuit Engineer Nerimo
- Moon Hunter Vezzlo
<Main Sources>
- Track Malefic Energy
- Annihilate the Maleficents
|
Malefic Residue (Tradable Once) x1
|
Account-bound
|
|
 Malefic Residue (Tradable Once) Pot (1 - 10) Malefic Residue (Tradable Once) Pot (1 - 10)
|
Contains 1 - 10 Malefic Residue (Tradable Once) according to each of their rates.
|
Malefic Residue x10
|
Account-bound
|
|
 Necklace Primeval Fusion Stone Pot Necklace Primeval Fusion Stone Pot
|
Contains 1 Necklace Primeval Fusion Stone, all at the same rate.
|
Merchant Guild Silver Coin x400
|
Account-bound
|
|
 Ring Primeval Fusion Stone Pot Ring Primeval Fusion Stone Pot
|
Contains 1 Ring Primeval Fusion Stone, all at the same rate.
|
Merchant Guild Silver Coin x400
|
Account-bound
|
|
 Lv. 110 Epic Fusion Stone Selection Box Lv. 110 Epic Fusion Stone Selection Box
|
Contains an Asrahan Armor Epic Fusion Stone or Asrahan Archives/Library Accessory/Special Equipment Epic Fusion Stone of your choice.
20 purchasable per account weekly
|
Merchant Guild Silver Coin x30
|
Account-bound
|
|
 Forgotten Light Box (3) Forgotten Light Box (3)
|
Contains 3 Forgotten Light.
|
Merchant Guild Silver Coin x15
|
Account-bound
|
|
 Energy Core Box (300) Energy Core Box (300)
|
Contains 300 Energy Cores.
10 purchasable per account weekly
|
Merchant Guild Silver Coin x35
|
Account-bound
|
|
 Superconductor Energy Core Box (4) Superconductor Energy Core Box (4)
|
Contains 4 Superconductor Energy Cores.
10 purchasable per account weekly
|
Merchant Guild Silver Coin x35
|
Account-bound
|
|
 Void Soul Box (Silver Coin) Void Soul Box (Silver Coin)
|
Contains 1 Void Soul.
Any remaining Purchases will be rolled over to the next month, up to a maximum of 100.
Example 1) If you make only 50 purchases in January, you can make up to 150 purchases in February.
Example 2) If you haven't made any purchases in January, you can make up to 200 purchases in February.
* If you don't make any purchases in February, either, then only 100 of your February purchases will be carried over to March and you can make up to 200 purchases in March.
|
Merchant Guild Silver Coin x50
|
Account-bound
|
|
Void Soul Box (Soul)
|
Contains 1 Void Soul.
Any remaining Purchases will be rolled over to the next month, up to a maximum of 200.
Example 1) If you make only 100 purchases in January, you can make up to 300 purchases in February.
Example 2) If you haven't made any purchases in January, you can make up to 400 purchases in February.
* If you don't make any purchases in February, either, then only 200 of your February purchases will be carried over to March and you can make up to 400 purchases in March.
|
Unique Soul x8
|
Account-bound
|
|
 Lv. 115 Set Unique Equipment Pot Selection Box Lv. 115 Set Unique Equipment Pot Selection Box
|
Contains a Lv. 115 Set Unique Equipment Pot for a set of your choice.
8 purchasable per account monthly
|
Unique Soul x10
500,000 Gold
|
Account-bound
|
|
 Lv. 105 Unique Weapon Selection Box Lv. 105 Unique Weapon Selection Box
|
Contains a Lv. 115 Unique weapon of your choice.
|
Unique Soul x15
750,000 Gold
|
Account-bound
|
|
 Black Fang Purification Scroll Black Fang Purification Scroll
|
Converts Black Fang accessories back to the original equipment.
|
100,000 Gold
|
Account-bound
|
Disciple of Doom/Abyss: Disciple of Doom Courier Bannibou Shop
When you clear the Disciple of Doom or Abyss: Disciple of Doom dungeon, NPC Courier Bannibou has a chance to appear.
You can buy the following items from NPC Courier Bannibou:
|
Purchasable Item
|
Description
|
Tradability
|
|
Materialized Malefic Clue
|
Used to enter the Annihilate the Maleficents dungeon.
|
Tradable once
(Account-bound after trade) |
|
Black Fang Epic Conversion Scroll Pot
|
Contains 1 Black Fang Epic Conversion Scroll of a random set, all at the same rate.
<Black Fang Epic Conversion Scroll>
Converts a Lv. 115 Set Epic accessory into a Black Fang Set Epic accessory.
Required Materials
- 1 Set Epic accessory that matches the conversion scroll
- 3 Epic Souls
- 500 Malefic Residue
- 2,200,000 Gold
|
Account-bound
|
|
Black Fang Primeval Conversion Scroll Pot
|
Contains 1 Black Fang Primeval Conversion Scroll of a random set, all at the same rate.
<Black Fang Primeval Conversion Scroll>
Converts a Lv. 115 Set Primeval accessory into a Black Fang Set Primeval accessory.
Required Materials
- 1 Set Primeval accessory that matches the conversion scroll
- 1 Primeval Soul
- 4,000 Malefic Residue
- 12,000,000 Gold
|
Account-bound
|
|
Lv. 115 Set Legendary Equipment Pot Selection Box
|
Contains a Lv. 115 Set Legendary Equipment Pot for a set of your choice.
10 Legendary Souls are required to open the pot.
|
Account-bound
|
|
Lv. 115 Set Epic Equipment Pot Selection Box
|
Contains a Lv. 115 Set Epic Equipment Pot for a set of your choice.
10 Epic Souls are required to open the pot.
|
Account-bound
|
Normal Dungeon
6 new Normal dungeons will be added to the Sunken Depths region.
- Complete the Lv. 115 Act quest, The Behemoth's Charge, to enter the dungeons.
Each dungeon has 3 maps, and you will enter a randomized map upon entry.
Content Info
Dungeon Entry Level: 115
Daily Entry Limit: None
Fatigue Cost: 2 per room
Party Mode: Available
Entry Materials: None
|
Category
|
Normal
|
|
Difficulty
|
Normal
|
Expert
|
Master
|
King
|
Slayer
|
|
Fame Requirement
|
0
|
13,195
|
16,690
|
35,170
|
42,143
|
Dungeon Info
Shimmering Archipelago
An area of Empty Sea subjected to strong currents and winds. The nature of the archipelago further accelerates these winds, shaking all the floating islands.
These erratic winds create unpredictable movements, causing the floating islands to collide with each other and suddenly move from one place to another.
From a distance, this irregular collection of floating islands looks like it's shining, hence the name, "Shimmering Archipelago."
The Shimmering Archipelago dungeon will be added to the Crimson Mine Village area of Sunken Depths.
Additional Elements
While exploring the dungeon, you can interact with certain monsters.
Interacting with these monsters will grant you a buff.
- Buff Effect: Movement Speed +70%
The acquired buff will be removed after 20 sec.
Hushed Corridor

A wide corridor that runs the length of the Temple of Death, with only the dreamy glow of the indigenous Sacred Beasts, the Jellypahs, and plants to illuminate the path.
It's called the Hushed Corridor because one must prove their piety by remaining silent at all times when walking through it.
The Hushed Corridor dungeon will be added to the Crimson Mine Village area of Sunken Depths.
Additional Elements
While exploring the dungeon, you can obtain a shadow sword from certain monsters or Mural of the Dead.
This shadow sword will follow you around, and when you press the Attack key, it will fly at monsters in front of you, decreasing their HP.
- Auto-fired when you encounter a Named/Boss monster.
Cruel Beast

The anti-great beast weapon and mothership of the Maleficence Raiders, the Cruel Beast has a very strong hull and is heavily armed to defend against large numbers of Malefic Beasts.
The large harpoons on the bow are especially powerful, capable of tearing through even airship-sized Malefic Beasts.
The Maleficence Raiders often purposefully drive the Cruel Beast in a wild manner to hunt down Maleficents efficiently.
The Cruel Beast dungeon will be added to the Inae area of Sunken Depths.
Additional Elements

Detonation Devices will appear in the dungeon.
Destroy these Detonation Devices to inflict great damage to monsters located on the map.
Once a Detonation Device is destroyed, all subsequent Detonation Devices that appear will explode in a chain reaction.
- The method of destroying Detonation Devices depends on the sub-name displayed when you enter the dungeon.
Heart of the Clear Sea

A term referring to the Azure Main's engine room. It absorbs the surrounding mist in real-time and reproduces it as power for the ship.
It's practically an infinite power source in Seon, where there's endless mist in the atmosphere due to the influence of the God of Mist.
Since it's the most important section of the entire ship, it's guarded by Sonic Boom Crassimor, the longest-serving member of the First Battalion known for his superior combat power among the Bluehawks.
The Heart of the Clear Sea dungeon will be added to the Inae area of Sunken Depths.
Additional Elements

Mutated Parasites will appear throughout the dungeon.
- Mutated Parasites inflict great damage to monsters when defeated.
Once a Mutated Parasite is defeated, all subsequent Mutated Parasites that appear will explode in a chain reaction.
- The method of defeating Mutated Parasites depends on the sub-name displayed when you enter the dungeon.
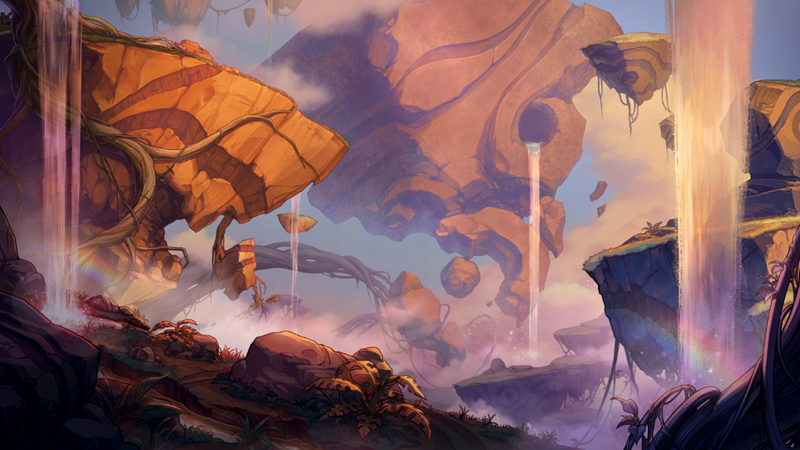
Starfall Forest

A massive forest surrounding Moon-Submerged Lake.
Filled with towering trees that almost block out the sky, it looks like the walls of a fortress from above.
Dark even in the daytime, the dense forest can be intimidating to newcomers, but they soon feel at home, thanks to the friendly Sacred Beasts that live throughout the place.
Young Moon Hunters, still learning to hunt, often come and mingle with the Sacred Beast residents here.
Additional Elements
Twinkle Digmings will appear throughout the dungeon.
- Approach and activate them for a chance to receive additional rewards.
Suspicious Bushes that appear throughout the dungeon will allow you to access hidden areas.
- Additional Twinkle Digmings can be found in the hidden areas.
You can get the additional reward after defeating the Boss monster.
Guiding River

A river fed by the waters of Moon-Submerged Lake.
It flows through many floating islands in the depths of Empty Sea, and is infested by powerful Maleficents that have come up from the adjacent Fount of Tribulation.
Only the best of the Moon Hunters, those who have proved themselves through the Rite of Departure, can open the path and reach it.
However, even the most skilled of them are often endangered by the lush vegetation and the constant flow of water through the floating islands of varying sizes.
Still, the Moon Hunters refuse to give up to come here and fight the Maleficents with the help of giant Sacred Beasts like Wulard.
The Guiding River dungeon will be added to the Sanctuary of Scattered Stars area of Sunken Depths.
Additional Elements
Twinkle Digmings will appear throughout the dungeon.
- Approach and activate them for a chance to receive additional rewards.
Digming in Blobs, Lost Digmings, and Fruit Trees will appear throughout the dungeon.
- You can attack the Digming in Blob to rescue the Twinkle Digming.
You can get the additional reward after defeating the Boss monster.
Additional Systems
Vanguard of Annihilation
You can encounter the Vanguard of Annihilation upon entering the dungeon.
- The Vanguard of Annihilation displays a special UI when obtained, lasting up to 15 sec.
- You can extend its duration by defeating monsters.
ㄴ The duration of the Moonbow Sacred Beast, Death's Shadow, or Maleficence Slayer Protocol can't be extended.
Activating Vanguard of Annihilation will randomly grant you 1 of the following effects.
|
Name
|
Effect
|
|
Moonbow Sacred Beast
(Starfall Forest/Guiding River)
|
Sets butterflies on monsters within a certain range, inflicting damage.
* Inflicts damage proportional to your Atk.
Not applicable to Named and Boss monsters.
|
|
Death's Shadow
(Shimmering Archipelago/Hushed Corridor)
|
Fires shadows at monsters within a certain range, inflicting damage.
* Inflicts damage proportional to your Atk.
Not applicable to Named and Boss monsters.
|
|
Maleficence Slayer Protocol
(Cruel Beast/Heart of the Clear Sea)
|
Fires laser beams at monsters within a certain range, inflicting damage.
* Inflicts damage proportional to your Atk.
Not applicable to Named and Boss monsters.
|
|
Sweeping Turbulence
|
Pulls nearby monsters toward you.
|
|
Titan Strike
|
Attack range +30%
|
|
Exploding Fury
|
Hitting monsters causes an explosion on the surrounding monsters.
* Inflicts damage proportional to your Atk.
|
|
Stealthy Steps
|
Movement/Attack/Casting Speed +30%
|
| Cold-Hearted Mind |
Cooldown recovery +30%
|
Normal Dungeon Rewards
Sunken Depths Normal/Scenario Dungeons
Drop Items (Normal Dungeons)
You'll get the following items upon defeating the Boss monster, according to each of their rates:
|
Obtainable Item
|
Description
|
Trade
Type
|
Obtainable Difficulty
|
|
Normal
|
Expert
|
Master
|
King
|
Slayer
|
|
Rare
Equipment
|
1 per weapon type
1 per Armor/Accessory/Special
Equipment part
|
Untradable
|
O
|
O
|
O
|
O
|
O
|
|
Unique
Equipment
|
1 per weapon type
12 per Armor/Accessory/Special
Equipment part
|
Untradable
|
O
|
O
|
O
|
O
|
O
|
|
Legendary Equipment
|
2 per weapon type
12 per Armor/Accessory/Special
Equipment part
|
Untradable
|
O
|
O
|
O
|
O
|
O
|
Digming's Fur Ball
|
Item Name
|
Description
|
Tradability
|
|
 Digming's Fur Balll Digming's Fur Balll
|
A tangled ball of fur that fell from Digming's store of treasure.
Each Digming has its own favorite treasures, so digging through its fur will reveal what they are. |
Untradable
|
Can be obtained as a Clear Card reward for clearing a dungeon.
Contains a reward, according to each of their rates. Items and their chances don't vary by difficulty:
|
Obtainable Item
|
Description
|
Tradability
|
|
 Monster Card (Legendary/Unique) Monster Card (Legendary/Unique)
|
A new Sunken Depths Enchantment Card
|
Tradable (Once)
|
|
Leiern Core
|
-
|
Untradable
|
|
Harmonious Crystal
|
-
|
Untradable
|
|
Warlord's Cry Potion [Digming]
|
Damage +12% for 60 sec.
This effect is canceled and its cooldown is reset when you're knocked down or move to town.
Deleted on the first day of each month at 09:00
|
Account-bound
|
|
HP/MP 20% Recovery Potion
|
HP/MP +20%
Deleted on the 1st day of each month at 09:00 UTC.
|
Account-bound
|
|
Merchant Guild Silver Coin
|
Used to buy the following items at the NPC Mystical Grimoire and NPC Kind Death Cenir Shops.
* Doom Oracle
* Void Soul
* Moon-Submerged Lake Legendary Card Album
* Necklace Primeval Fusion Stone Pot
* Ring Primeval Fusion Stone Pot
* Lv. 110 Epic Fusion Stone Selection Box
* Forgotten Light
|
Account-bound
|
Courier Bannibou Secret Shop
Bannibou's Secret Shop, which has a chance of appearing when you clear dungeons, sells the following items, according to each of their rates:
|
Item Name
|
Description
|
Obtainable Difficulty
|
Tradability
|
|
Normal
|
Expert
|
Master
|
King
|
Slayer
|
 Materialized Malefic Clue Materialized Malefic Clue |
Used to enter the Annihilate the Maleficents dungeon.
|
O
|
O
|
O
|
O
|
O
|
Tradable once
(Account-bound after trade) |
Scenario Dungeon Rewards
When you clear the dungeon, you can get all the items that can be obtained in the Normal dungeon, except for Legendary cards.
- Depending on the placement of Normal/Named/Boss monsters in each dungeon, the type/total amount of rewards may vary.
Drops
You'll get the following items upon defeating the Boss monster, according to each of their rates:
|
Obtainable Item
|
Description
|
Tradability
|
Obtainable Difficulty
|
|
|
|
|
Normal
|
Expert |
Master |
King |
|
Rare Equipment
|
1 per weapon type
1 per Armor/Accessory/Special Equipment part
|
Untradable
|
O
|
O
|
O
|
O
|
|
Unique Equipment
|
1 per weapon type
12 per Armor/Accessory/Special Equipment part
|
Untradable
|
O
|
O
|
O
|
O
|
|
Legendary Equipment
|
2 per weapon type
12 per Armor/Accessory/Special Equipment part
|
Untradable
|
O
|
O
|
O
|
O
|
Digming's Fluff Ball
|
Item Name
|
Description
|
Tradability
|
 Digming's Fluff Ball Digming's Fluff Ball |
A tangled ball of fluff that fell from Digming's store of treasure.
Each Digming has its own favorite treasures, so digging through its fur will reveal what they are. |
Untradable
|
Can be obtained as a Clear Card reward for clearing a Scenario dungeon.
Contains a reward, according to each of their rates. Items and their chances don't vary by difficulty.
|
Obtainable Item
|
Description
|
Tradability
|
|
 Rare Equipment Rare Equipment
|
1 per weapon type
1 per Armor/Accessory/Special Equipment part
|
Untradable
|
|
 Unique Equipment Unique Equipment
|
1 per weapon type
12 per Armor/Accessory/Special Equipment part
|
Untradable
|
|
 Legendary Equipment Legendary Equipment
|
2 per weapon type
12 per Armor/Accessory/Special Equipment part
|
Untradable
|
|
 Monster Card (Unique) Monster Card (Unique)
|
A new Sunken Depths Unique Enchantment Card
|
Tradable (Once)
|
|
Leiern Core
|
-
|
Untradable
|
|
Harmonious Crystal
|
-
|
Untradable
|
|
Warlord's Cry Potion [Digming]
|
Damage +12% for 60 sec
This effect is canceled and its cooldown is reset when you're knocked down or move to town.
Deleted on the first day of each month at 09:00
|
Account-bound
|
|
HP/MP 20% Recovery Potion
|
HP/MP +20%
Deleted on the 1st day of each month at 09:00 UTC.
|
Account-bound
|
|
Merchant Guild Silver Coin
|
Used to buy the following items at the Mystical Grimoire and Kind Death Cenir NPC Shops.
* Doom Oracle
* Void Soul
* Moon-Submerged Lake Legendary Card Album
* Necklace Primeval Fusion Stone Pot
* Ring Primeval Fusion Stone Pot
* Lv. 110 Epic Fusion Stone Selection Box
* Forgotten Light
|
Account-bound
|
Track Malefic Energy/Annihilate the Maleficents
|

Sunken Depths has launched a massive investigation to trace the source of the sudden surge in Malefic Energy.
They must find out how the Maleficents have appeared and where the Malefic Energy that turned so many Sacred Beasts into Malefic Beasts came from.
|
|

Numerous organizations have begun to mobilize in an effort to completely eradicate the Maleficents that plague Sunken Depths.
This operation will not end until all Maleficents in Sunken Depths have been annihilated.
|
The new dungeons, Track Malefic Energy and Annihilate the Maleficents, will be added to the Inae, Crimson Mine Village, and Sanctuary of Scattered Stars areas of Sunken Depths.
- Complete the Lv. 115 Act quest, The Behemoth's Charge, to enter the dungeons.
These dungeons are set in Sunken Depths, with a randomized area appearing in the background each time you enter.
Content Info
|
Category
|
Track Malefic Energy
|
Annihilate the Maleficents
|
|
Entry Level
|
115
|
115
|
|
Recommended Party Size
|
1 ppl
|
1 ppl
|
|
Recommended Fame
|
13,195
|
13,195
|
|
Entry Fatigue Cost
|
8 upon entry
|
8 upon entry
|
|
Entry Materials
|
-
|
Materialized Malefic Clue x1
|
Additional Reward System
Objects appear throughout the dungeon that yield additional rewards.
- Starfall Forest/Guiding River: Fallen Moon Hunter
- Shimmering Archipelago/Hushed Corridor: Twinkle Digming
- Cruel Beast/Heart of the Clear Sea: Purge Device
By interacting with these objects, you can get additional rewards after defeating the Boss monster.
- In the Track Malefic Energy dungeon, 1 object will appear.
- In the Annihilate the Maleficents dungeon, 2 - 4 objects will appear, according to set rates.
Track Malefic Energy Rewards
In this dungeon, you can get Gold routinely.
- Equipment not available
Drops
You'll get the following items upon defeating monsters, according to each of their rates:
|
Obtainable Item
|
Description
|
Tradability
|
|
 Malefic Residue Malefic Residue
|
A trace of malefic energy. It's so tenuous that it can't contaminate anything,
but since it has academic research value, some eccentrics will pay good money for it.
<Main Purposes>
- To craft Black Fang equipment
- Creature Artifact recipe material
- NPC shop purchases
<Main Use NPCs>
- Kind Death Cenir
- Circuit Engineer Nerimo
- Moon Hunter Vezzlo
<Main Sources>
- Track Malefic Energy
- Annihilate the Maleficents
|
Account-bound
|
|
Leiern Core
|
-
|
Untradable
|
|
Harmonious Crystal
|
-
|
Untradable
|
Courier Bannibou Secret Shop
Bannibou's Secret Shop, which has a chance of appearing when you clear dungeons, sells the following items.
|
Item Name
|
Description
|
Tradability
|
|
 Materialized Malefic Clue Materialized Malefic Clue
|
Used to enter the Annihilate the Maleficents dungeon.
|
Tradable once
(Account-bound after trade) |
Annihilate the Maleficents Rewards
You can enter this dungeon by using the Materialized Malefic Clue item.
- You can get a lot of Gold and Malefic Residue, with a chance of a Tradable Malefic Residue dropping.
- Equipment not available
Drops
You'll get the following items upon defeating monsters, according to each of their rates:
|
Obtainable Item
|
Monster Type
|
Tradability
|
Description
|
|
Normal Monster
|
Named Monster
|
Boss Monster
|
|
Malefic Residue (Tradable Once)
|
O
|
O
|
O
|
Tradable
|
A trace of malefic energy. It's so tenuous that it can't contaminate anything, but since it has academic research value, some eccentrics will pay good money for it.
<Main Purposes>
- To buy Malefic Residue materials
<Main Use NPCs>
- Kind Death Cenir
- Circuit Engineer Nerimo
- Moon Hunter Vezzlo
<Main Sources>
- Annihilate the Maleficents
|
|
Malefic Residue
|
O
|
O
|
O
|
Account-bound
|
A trace of malefic energy. It's so tenuous that it can't contaminate anything, but since it has academic research value, some eccentrics will pay good money for it.
<Main Purposes>
- To craft Black Fang equipment
- Creature Artifact recipe material
- NPC shop purchases
<Main Use NPCs>
- Kind Death Cenir
- Circuit Engineer Nerimo
- Moon Hunter Vezzlo
<Main Sources>
- Track Malefic Energy
- Annihilate the Maleficents
|
|
 Uncommon Artifact Uncommon Artifact
|
|
|
O
|
Sealed
|
Contains 1 of 18 different Uncommon Artifacts, according to each of their rates.
|
|
 Rare Artifact Rare Artifact
|
|
|
O
|
Sealed |
Contains 1 of 27 different Rare Artifacts, according to each of their rates.
|
|
 Unique Artifact Unique Artifact
|
|
|
O
|
Sealed |
Contains 1 of 12 different Unique Artifacts, according to each of their rates.
|
|
 Condensed Leiern Core Condensed Leiern Core
|
O
|
O
|
O
|
Account-bound
|
|
|
 Radiant Harmonious Crystal Radiant Harmonious Crystal
|
O
|
O
|
O
|
Account-bound
|
|
|
 Flawless Leiern Core Flawless Leiern Core
|
|
|
O
|
Tradable
|
|
|
 Flawless Harmonious Crystal Flawless Harmonious Crystal
|
|
|
O
|
Tradable
|
|
Courier Bannibou Secret Shop
Bannibou's Secret Shop, which has a chance of appearing when you clear dungeons, sells the following items:
|
Item Name
|
Description
|
Tradability
|
|
Materialized Malefic Clue
|
Used to enter the Annihilate the Maleficents dungeon.
|
Tradable once
(Account-bound after trade) |
|
 Rare Artifact Recipe Rare Artifact Recipe
|
Creates the corresponding Rare Artifact without fail.
The resulting item is sealed.
|
Account-bound
|
|
 Unique Artifact Recipe Unique Artifact Recipe
|
Creates the corresponding Unique Artifact without fail.
The resulting item is sealed.
|
Account-bound
|
|
 Dark Fragmented Abyss Equipment Recipe Dark Fragmented Abyss Equipment Recipe
|
Creates the corresponding Dark Fragmented Abyss equipment without fail.
|
Account-bound
|
|
Unique Artifact
|
You can buy Unique Artifacts.
|
Sealed |
Malefic Residue Shop
You can exchange Malefic Residue for items through the NPC Shops below:
- Moon Hunter Vezzlo
- Circuit Engineer Nerimo
- Kind Death Cenir
|
Item Name
|
Trade Type
|
Purchase Materials
|
Purchase Limit
|
Item Description
|
|
 Free Repair Coupon (Malefic Residue) Free Repair Coupon (Malefic Residue)
|
Account-Bound |
Malefic Residue x10 |
4 per account
(weekly)
|
Fully repairs all your equipment free of charge.
Deleted on the first day of each month at 09:00
|
|
 Malefic Residue (Tradable Once) Pot (1 - 10) Malefic Residue (Tradable Once) Pot (1 - 10)
|
Account-bound
|
Malefic Residue x10
|
-
|
Contains 1 - 10 Tradable Malefic Residue, according to each of their rates.
|
|
 Malefic Residue Malefic Residue
|
Account-bound
|
Malefic Residue (Tradable Once) (1)
|
|
A trace of malefic energy. It's so tenuous that it can't contaminate anything, but since it has academic research value, some eccentrics will pay good money for it.
<Main Purposes>
- To craft Black Fang equipment
- Creature Artifact recipe material
- NPC shop purchases
<Main Use NPCs>
- Kind Death Cenir
- Circuit Engineer Nerimo
- Moon Hunter Vezzlo
<Main Sources>
- Track Malefic Energy
- Annihilate the Maleficents
|
|
Dark Fragmented Abyss Selection Box
|
Account-bound
|
Malefic Residue x500
|
1 per account (monthly)
|
Contains 1 Dark Fragmented Abyss equipment of your choice.
The resulting equipment is permanent and untradable.
|
Memories of Triumph
Memories of Triumph
The Monthly content, the <Memories of Triumph>, will be added.
The Lv. 115 Side Story quest, Bunnyhorn's Proposition, will be added.
- This quest becomes available after you complete the quest, Sunken Depths: The Behemoth's Charge.
Content Entry
Accept the Side Story quest, Bunnyhorn's Proposition, to enter the Special channel, <Memories of Triumph>.
The <Memories of Triumph> channel requires 33,992 or higher Fame to enter.
In the Memories of Triumph channel, select NPC Bunnyhorn the Freak or the tier you want to challenge through the UI on the right to enter the content.
|
Bunnyhorn the Freak
|
UI
|
|

|

|
Content Info
|
Category
|
Description
|
|
Entry Level
|
115
|
|
Players
|
Solo Mode/4-Player Mode
|
|
Entry Fame
|
33,992
|
|
Entry Fatigue Cost
|
X
|
|
Entry Limit
|
Solo Mode
* No entry restrictions
4-Player Mode
* Can't re-enter cleared tiers.
|
|
Reward Count
|
Common Features
* Conditional rewards available once a month per tier
Solo Mode
* Tiered rewards available based on monster HP decrease
4-Player Mode
* Rewards available on clear
|
Tier
The Memories of Triumph is organized into difficulty levels from Tier 1 to 10.
You'll start at Tier 1, and when you clear it, the next tier becomes available.
- Your tier will drop by 1 from the baseline the following month, and you'll be reset to Tier 1 the following month if you don't play it at all this month.

Content Rules
Basic Rules
|
Category
|
Description
|
|
Time Limit
|
Tiers 1 - 9
* 4 min.
Tier 10
* 6 min.
|
|
Common Rules
|
Playtime -20 sec. when using a Life Token
Restricted to 5 individual healing consumables
|
|
Entry Fame
|
|
Tier
|
Entry Fame
|
|
1
|
33,992
|
|
2
|
41,830
|
|
3
|
45,744
|
|
4
|
48,988
|
|
5
|
52,496
|
|
6
|
54,604
|
|
7
|
56,119
|
|
8
|
58,596
|
|
9
|
59,976
|
|
10
|
61,296
|
|
|
Entry Rules
|
Solo Mode
* Can re-enter a tier after clearing it.
4-Player Mode
* Can't re-enter cleared tiers.
|
|
Entry Limit
|
Character Limits
* Up to 8 characters per account monthly
* Characters bound to Memories of Triumph upon entry
|
|
Monthly Reset
|
Characters unbound on the first day of each month at 09:00 UTC
Unbound characters -1 tier
Reset to Tier 1 the following month if there's no play record after unbound
|
|
Clear Conditions
|
Tiers 1 - 10
* Defeat all monsters on the tier.
Tier 10 (Solo Mode Only)
* Infinite mode for the remaining duration after defeating the Boss
|
Guard System
In the Memories of Triumph content, you can use the Guard skill by assigning it to Dungeon Special Key 2.
A successful Guard restores HP/MP for 5 sec., and the Guard skill can be reused immediately.
It can be used by canceling your action, except in certain situations.
You can cancel Guard with the Jump key while it's in effect.

Score System
Each tier has an Accomplished Score that can be reached.
Accomplished Scores are accumulated as your Ranking Score and count toward your Memories of Triumph ranking.
- Scores are accumulated and count toward rankings in Solo mode only.

Infinite Mode
At tier 10 in Solo mode, the Boss monster recovers HP even after it's defeated.
Infinite mode then begins and you can earn additional points for your Accomplished Score for the remainder of the time.

Solo Mode: How to Get a Reward
In Solo mode, rewards will be issued to your inventory after the end of play, based on the decreased monster HP.
Rewards for each tier are issued once a month, and you can't earn rewards from the same tier twice.
If you clear a higher tier after the next month, the rewards for the lower tiers will be issued automatically, even if you haven't played them.
- Note: If you clear a higher tier, all cleared tiers, including the lower tiers, will become unavailable for 4-Player mode play until the following month.

4-Player Mode: How to Get a Reward
In 4-Player mode, you must clear the selected tier before that tier's rewards are issued to your inventory.
The rewards for each tier in 4-Player mode will be shared with Solo mode, and only unearned tiers will be rewarded.
Tiers that have already been cleared can't be played again in 4-Player mode.
Memories of Triumph Rewards
Basic Rewards
You can get rewards for clearing the dungeon, depending on your progress.
|
Obtainable Item
|
Description
|
Tradability
|
 Memories of Triumph Fragment Memories of Triumph Fragment |
Used to buy Epic/Legendary/Unique Pots and Doom Oracles.
|
Untradable
|
Shop
A shop will be added for NPC Bunnyhorn the Freak in the Memories of Triumph channel.
|
Purchasable Item
|
Description
|
Purchase Materials
|
Tradability
|
|
 Lv. 115 Epic Equipment Pot Lv. 115 Epic Equipment Pot
|
Contains 1 Lv. 115 Epic Equipment item, according to each of their rates.
|
Memories of Triumph Fragment x750
|
Untradable
|
|
 Lv. 115 Legendary Equipment Pot Lv. 115 Legendary Equipment Pot
|
Contains 1 Lv. 115 Legendary Equipment item, according to each of their rates.
|
Memories of Triumph Fragment x350
|
Untradable
|
|
 Lv. 115 Unique Equipment Pot Lv. 115 Unique Equipment Pot
|
Contains 1 Lv. 115 Unique Equipment item, according to each of their rates.
|
Memories of Triumph Fragment x80
|
Untradable
|
|
 Doom Oracle Box (9) Doom Oracle Box (9)
|
Contains 9 Doom Oracles.
|
Memories of Triumph Fragment x10
|
Untradable
|
 Edge
Click the "View Site Information" icon on the left side of the address bar,
Edge
Click the "View Site Information" icon on the left side of the address bar, Firefox
Select "Allow" in the notification window that appears
Firefox
Select "Allow" in the notification window that appears Other browsers
Allow blocked notifications in your browser’s settings.
Other browsers
Allow blocked notifications in your browser’s settings.
.jpg)


.jpg)
.jpg)
.jpg)
.jpg)
.jpg)
.jpg)
.jpg)
.jpg)
.jpg)
.jpg)
.jpg)
.jpg)
.jpg)
.jpg)
.jpg)
.jpg)
.jpg)
.jpg)
.jpg)
.jpg)
.jpg)
.jpg)
.jpg)
.jpg)
.jpg)

.jpg)
.jpg)
.jpg)
.jpg)
.jpg)

.jpg)


.jpg)

.jpg)


.jpg)


.jpg)